
Managing cloud infrastructure today spans dozens of tools: Terraform for provisioning, Kubernetes dashboards for cluster state, AWS/GCP consoles for resource monitoring, Datadog or Prometheus for observability, and spreadsheets (still!) for service ownership. The result? Fragmented visibility, misaligned teams, and frustrating developer experiences.
This guide walks you through turning Backstage , the open-source developer platform from Spotify , into a unified control center for your cloud infrastructure. You’ll learn how to use its catalogue architecture to visualize cloud assets, automate provisioning, and drive better ownership across AWS, GCP, and Kubernetes.
What is Backstage and Why Use It for Cloud Resource Management
Backstage is an open-source developer portal created by Spotify to solve a growing problem: developers were spending more time navigating infrastructure than shipping code. It provides a centralized UI for service catalogs, documentation, and developer tools, all customizable through a powerful plugin system.
At its core, Backstage answers a simple question:
"Can we give developers a single, consistent interface to discover, operate, and manage software, regardless of the underlying tooling?"
For cloud infrastructure, the value of that abstraction becomes even more powerful.
How Backstage Unifies Tools, Docs, and Infrastructure
Backstage isn’t just a dashboard , it’s a metadata-driven platform. It maps every service, resource, or component in your system to a structured entity in its Software Catalog. This catalog becomes the backbone for:
- Viewing ownership details, runtime health, links to monitoring dashboards, and code repos
- Surfacing contextual documentation via TechDocs
- Triggering operational workflows like provisioning or deployments through plugins and the Scaffolder
For platform teams, this means every tool or infra system , whether it's a Kubernetes cluster or a Terraform pipeline , can be exposed in a consistent, developer-friendly way.

Traditional Cloud Visibility is Siloed and Reactive
Cloud resource management without a central portal often looks like this:
Each of these gaps creates friction, slow incident resolution, over-provisioned infra, compliance blind spots, and onboarding delays.
Backstage solves this by centralizing operational context. Instead of forcing devs to learn dozens of dashboards, you bring the insights to them, inside the developer portal.
Backstage as a Self-Service Cloud Interface
Think of Backstage as a control plane for developers, built on metadata.
Once plugged into your cloud ecosystem, it can:
- Display the state of your cloud infrastructure (e.g. pods, functions, VMs, Terraform states)
- Surface service-specific observability data (logs, metrics, alerts)
- Enable self-service actions like provisioning new environments or rotating secrets
Key Cloud Use Cases Enabled by Backstage
Backstage transforms how developers and platform teams interact with their cloud infrastructure, not by replacing your cloud tools, but by organizing and exposing them in one consistent, service-centric UI. Below are three core use cases where Backstage adds real operational value across AWS, GCP, Kubernetes, and more.
Visualizing Cloud Resources
One of the most common cloud pain points is fragmented visibility. Cloud assets, VMs, buckets, namespaces, often exist in silos with no easy way to map them back to the services or teams that created them. Backstage solves this through its Software Catalog, enriched with custom metadata and tags.
Here’s how it works in practice:
- Each service in the catalog is annotated with ownership, environment type, repo links, and optionally, cloud resource identifiers (e.g., ARNs, namespace names).
- Plugins like the AWS Plugin by Roadie or the Kubernetes Plugin can automatically detect and display live infrastructure tied to those services.
- This creates a unified view of a backstage developer portal where user can click into a service and instantly see:
- Which EC2 instance it runs on
- What Kubernetes namespace it’s deployed to
- Who owns it
- How it’s performing
- Which EC2 instance it runs on
In traditional Backstage setups, Role-Based Access Control (RBAC) is often used to control who can see or provision what, ensuring sensitive templates or cloud resources aren't visible to everyone by default. But as infrastructure scales across multiple cloud accounts and environments, managing visibility and ownership using only Backstage’s built-in tools can become complex and fragmented.
This is where a purpose-built integration like Firefly’s Backstage plugin steps in, offering deep, automated cloud visibility, enriched ownership mapping, and drift detection — all within your Backstage interface.

Instead of bouncing between multiple cloud consoles, teams get one pane of glass for their infrastructure context.
Infrastructure Provisioning via Scaffolder
Provisioning new infrastructure typically requires navigating CLI tools, Terraform modules, or waiting on platform teams. Backstage flips this by offering self-service provisioning via the Scaffolder.
Platform teams can build templates for repeatable infrastructure patterns, say, spinning up an S3 bucket or Kubernetes namespace, and expose them through Backstage’s UI. Developers simply fill out a form and submit.
For example:
- Select the “Create S3 Bucket” template
- Fill in service name, environment (dev/staging/prod), and region
- Submit → Scaffolder triggers a Terraform workflow tied to your GitOps flow
This gives developers a fast, compliant way to spin up infra without tickets, while platform teams retain control over provisioning logic and guardrails.
1. Backstage aws plugin Template for S3 Bucket Provisioning (with Terraform)
# templates/create-s3-bucket/template.yaml
apiVersion: scaffolder.backstage.io/v1beta3
kind: Template
metadata:
  name: create-s3-bucket
  title: Create AWS S3 Bucket
  description: Scaffold a new S3 bucket with standard naming and tags
spec:
  owner: platform-team
  parameters:
    - title: Bucket Information
      required:
        - bucketName
      properties:
        bucketName:
          type: string
          title: Bucket Name
  steps:
    - id: terraform
      name: Run Terraform
      action: terraform:apply
      input:
        path: ./terraform
        variables:
          bucket_name: ${{ parameters.bucketName }}
Directory Structure:
templates/
└── create-s3-bucket/
    ├── template.yaml
    └── terraform/
        └── main.tf
2. Terraform main.tf
provider "aws" {
  region = "us-west-2"
}

resource "aws_s3_bucket" "bucket" {
  bucket = var.bucket_name
  tags = {
    ManagedBy = "Backstage"
  }
}
Incident Triage and Cost Awareness
Backstage also plays a valuable role during outages, degradations, or cost spikes, especially when infra insights are connected to the right service context.
By integrating observability and monitoring tools into Backstage, you can surface:
- Latency, error rates, or CPU spikes from Datadog, Prometheus, or New Relic
- Ownership-aware cost breakdowns using the Cost Insights plugin (great for GCP)
- Incident routing and escalation via the Opsgenie plugin
What makes this powerful is context. Instead of looking at isolated charts, you see them next to the service that triggered the alarm, along with:
- Who owns the service
- When it was last deployed
- What cloud resources it's running on
This shortens triage time and puts the right data before the right people.
1. Cost Insights Plugin Config for GCP
In app-config.yaml:
costInsights:
  engineerCost: 100000
  products:
    - id: payments
      name: Payment Processing
      aggregation: daily
      default: true
      entities:
        - payment-service
2. Service Annotation for Cost Plugin
In catalog-info.yaml:
metadata:
  annotations:
    cost-insights.backstage.io/product: payments
3. Opsgenie Plugin Sample Config
In app-config.yaml:
opsgenie:
  apiKey: ${OPSGENIE_API_KEY}
  region: us
And corresponding component annotation:
metadata:
  annotations:
    opsgenie.com/component-id: payment-service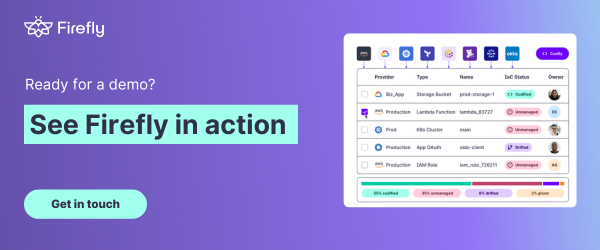
Hands-On Setup – Building Your Backstage Cloud Hub
This guide walks you through setting up Backstage , an open platform for building developer portals , and extending it with cloud visibility plugins and custom metadata integrations.
Step 1 – Set Up Backstage Locally or on Kubernetes
1. Scaffold a New Backstage App
Run the following command to generate a basic Backstage app structure:
npx @backstage/create-app
Follow the interactive prompts to name your app and set up its base structure.
2. Choose Your Deployment Method
Local Dev (for quick iteration):
cd my-backstage-app
yarn dev
- Kubernetes Deployment (for production-like setup):
- Containerize the app using Docker.
- Deploy using Helm chart:
https://github.com/backstage/charts
- Containerize the app using Docker.
3. Understand the Plugin Architecture
- All features in Backstage are plugins.
- Each plugin lives in plugins/<plugin-name>.
- Core app configuration is in packages/app/src.
Explore files like:
plugins/catalog
packages/app/src/plugins.ts
These define and import plugins into your running app.
Step 2 – Integrate the Software Catalog
1. Add catalog-info.yaml to Each Service Repo
Example:
apiVersion: backstage.io/v1alpha1
kind: Component
metadata:
  name: my-service
  description: My microservice
spec:
  type: service
  lifecycle: production
  owner: team-a
Place this file in the root of each repo you'd like to track.
2. Link Entities to Teams and Infrastructure
Update the catalog with:
- owner: maps to teams.
- dependsOn: link infra elements or services.
- providesApis: expose API components.
3. Enable Ingestion from GitHub, GitLab, or Bitbucket
Edit your app-config.yaml:
catalog:
  providers:
    github:
      your-org:
        organization: your-org
        schedule:
          frequency: { minutes: 30 }
For GitLab or Bitbucket, refer to:
- GitLab provider docs
- Bitbucket provider docs
Step 3 – Install Core Cloud Plugins
Each plugin adds observability into a different cloud provider or IaC tool.
1. Kubernetes Plugin
yarn add @backstage/plugin-kubernetes
Configure it in app-config.yaml:
kubernetes:
  serviceLocatorMethod:
    type: multiTenant
Display pods, deployments, and resource usage per service.
2. AWS Plugin
yarn add @backstage/plugin-aws-cloudwatch
Set up via AWS CloudFormation metadata to expose:
- S3 buckets
- Lambda functions
- CloudWatch logs
3. GCP Plugin
yarn add @backstage/plugin-gcp-projects
Shows GCP resources linked to the Backstage catalog:
- Projects
- Functions
- Storage
4. Annotating services in catalog-info.yaml
apiVersion: backstage.io/v1alpha1
kind: Component
metadata:
  name: payment-service
  annotations:
    backstage.io/kubernetes-id: payment-service
    aws.amazon.com/arn: arn:aws:ec2:region:account-id:instance/instance-id
    cost-insights.backstage.io/product: payments
spec:
  type: service
  owner: team-a
lifecycle: production- These annotations link your service to Kubernetes and AWS plugins.
- The AWS plugin can resolve and visualize EC2, S3, etc.
- Kubernetes plugin will show deployments, pods, namespaces, etc.
5. Backstage Kubernetes Plugin Configuration
In app-config.yaml:
kubernetes:
  serviceLocatorMethod:
    type: multiTenant
  clusterLocatorMethods:
    - type: config
      clusters:
        - url: https://<your-cluster-url>
          name: your-cluster
          authProvider: serviceAccount
          serviceAccountToken: ${K8S_TOKEN}
          skipTLSVerify: true
6. Firefly Plugin
yarn add @fireflyai/backstage-backend-plugin-firefly
yarn add @fireflyai/backstage-plugin-firefly
Optional: Plugin Authentication
Use either:
- Service accounts (recommended for automation)
- Workload Identity Federation (for GCP/GKE)
- OAuth or IAM roles (for user-specific access)
Auth setup varies per plugin and cloud provider.
Step 4 – Build a Custom Plugin for Cloud Metadata (Optional)
1. Scaffold a New Plugin
yarn backstage-cli create-plugin
Choose a name like cloud-metadata.
2. Implement Plugin UI Logic
Inside plugins/cloud-metadata/src/components/CloudMetadataPage.tsx:
import React, { useEffect, useState } from 'react';
import { Content, Header, Page } from '@backstage/core-components';

export const CloudMetadataPage = () => {
  const [data, setData] = useState<any>(null);

  useEffect(() => {
    fetch('/api/cmdb/status') // Example endpoint
      .then(res => res.json())
      .then(setData);
  }, []);

  return (
    <Page themeId="tool">
      <Header title="Cloud Metadata" subtitle="Custom Cloud Status View" />
      <Content>
        {data ? (
          <pre>{JSON.stringify(data, null, 2)}</pre>
        ) : (
          'Loading metadata...'
        )}
      </Content>
    </Page>
  );
};
3. Add Plugin to App
Edit packages/app/src/plugins.ts:
export { cloudMetadataPlugin } from '@backstage/plugin-cloud-metadata';
And add a route in App.tsx:
<FlatRoutes>
  <Route path="/cloud-metadata" element={<CloudMetadataPage />} />
</FlatRoutes>
Best Practices for Maintaining a Cloud Configuration Management Hub in Backstage
Once Backstage becomes your internal cloud operations hub, it's essential to keep things reliable, discoverable, and secure. These best practices help you maintain high visibility, scale plugin performance, and govern access without friction.
Metadata Hygiene
The foundation of Backstage’s cloud visibility lies in well-maintained metadata. When catalog files get outdated or inconsistent, your cloud-resource mapping breaks down.
What to do:
Keep catalog-info.yaml files updated:
Regularly sync metadata like owner, system, lifecycle, and tags with reality.
apiVersion: backstage.io/v1alpha1
kind: Component
metadata:
  name: checkout-service
  description: Checkout microservice for payments
  tags:
    - aws
    - cost-center-finops
  annotations:
    backstage.io/techdocs-ref: dir:.
spec:
  type: service
  owner: team-payments
  lifecycle: production
Standardize tag taxonomy across teams:
Define a set of required fields and enforce their usage via CI checks.
Example schema check in CI:
backstage-cli catalog:validate ./catalog-info.yaml
- Automate stale metadata detection:
Write scripts or use plugins to flag services that haven’t been updated recently.
Plugin Observability
Backstage's plugins fetch live infrastructure data like GCP Plugin, AWS Plugin, Kubernetes Plugin, but without proper observability, failures go unnoticed and UI reliability suffers.
Key practices:
Enable structured plugin logging:
Make sure plugins log fetch times, errors, and status updates. Example in a custom plugin:
try {
  const response = await fetchCloudData();
  logger.info(`Fetched data for ${serviceId}`);
  return response;
} catch (err) {
  logger.error(`Error fetching cloud data: ${err}`);
  throw err;
}
- Use Backstage’s metrics with Prometheus/Grafana:
Expose plugin health metrics via /metrics endpoints if supported, and visualize failures or latency. - Track usage patterns for scaling:
Use Google Analytics or PostHog for frontend usage patterns to identify underused or high-impact plugins.
Firefly Backstage Plugin: Unified Cloud Resource Management
The Firefly Backstage plugin provides a comprehensive view of your cloud infrastructure directly within Backstage. It enables platform teams to monitor, manage, and optimize cloud resources across providers like AWS, GCP, Azure, and Kubernetes.
Key Features
- Asset Importation: Automatically import cloud assets and accounts as catalog entities in Backstage.
- Relationship Mapping: Visualize dependencies between cloud resources, systems, and components.
- IaC Coverage Tracking: Identify unmanaged or drifted resources and assess Infrastructure-as-Code (IaC) coverage across your infrastructure.
- Dedicated Dashboard: Access a centralized dashboard displaying key metrics, including the number of cloud resources, systems, and top components with unmanaged or drifted resources.
Installation Steps
Backend Plugin Installation:
- Install the plugin package:
yarn add @fireflyai/backstage-backend-plugin-firefly- Add Firefly Secrets to Your Environment
Set your Firefly credentials as environment variables:
export FIREFLY_ACCESS_KEY=<your-access-key>
export FIREFLY_SECRET_KEY=<your-secret-key>- Configure the plugin in your app-config.yaml:
Add the following to your configuration file:
firefly:
  periodicCheck:
    interval: 3600  # seconds (default: 3600)
    importSystems: true  # import cloud accounts as systems
    correlateByComponentName: true  # if a resource tag value is equals to the component name, relate the resource to that component
    importResources: true  # import assets as resources
    tagKeysIdentifiers: # Optional:tag keys to use as identifiers for relating resources to their corresponding components
      - environment
      - component
    filters:
      # Optional filters to apply when fetching assets
      assetTypes:
        - aws_s3_bucket
        - aws_lambda_function
      providerIds:
        - '123456789012'
- 'devops-651215' - Add the plugin to your backend:
// In packages/backend/src/index.ts or equivalent add the following:
backend.add(import('@fireflyai/backstage-backend-plugin-firefly'));
- Install the frontend plugin package:
yarn add @fireflyai/backstage-plugin-firefly
- Register the Firefly Page Route
// In packages/app/src/App.tsx
import { FireflyPage } from '@fireflyai/backstage-plugin-firefly';

<Route path="/firefly" element={<FireflyPage />} />;- Add a sidebar item for easy navigation:
import ExtensionIcon from '@material-ui/icons/Extension';
import { SidebarItem } from '@backstage/core-components';

// Add to your sidebar items
<SidebarItem icon={ExtensionIcon} to="firefly" text="Firefly" />;
- Add IaC Coverage Card to Entity Pages
Edit packages/app/src/components/catalog/EntityPage.tsx:
import { EntityDependenciesIaCCoverageCard } from '@fireflyai/backstage-plugin-firefly';

// Add this to your entity page layout
<Grid item md={4} xs={12}>
  <EntityDependenciesIaCCoverageCard />
</Grid>
For detailed installation and configuration instructions, refer to the Firefly Backstage Plugin Documentation.
By integrating the Firefly plugin, you can achieve a unified view of your cloud infrastructure, streamline resource management, and enhance visibility across your organization's cloud assets.
Conclusion
Backstage helps unify fragmented cloud tools into a single interface tailored to your organization. With the Software Catalog, teams gain visibility into service ownership and linked cloud resources. Plugins for AWS, GCP, Kubernetes, monitoring, and cost insights surface live data where developers work.
Scaffolder enables self-service infrastructure provisioning through reusable templates, while RBAC and plugins like Firefly ensure access is scoped to the right teams.
When set up well, Backstage becomes more than a portal, it turns into a branded cloud operations console that streamlines visibility, governance, and automation.
FAQs
1. How secure is exposing cloud resources in Backstage?
It depends on how plugins and access control are configured. Sensitive resources should be scoped using RBAC, and secrets should never be passed directly to the frontend.
2. Can I use Backstage for multi-cloud environments?
Yes. Backstage is cloud-agnostic. You can run AWS, GCP, Azure, and Kubernetes plugins side by side, each scoped to their appropriate services.
3. What are alternatives to Backstage for internal developer platforms?
Alternatives include Humanitec, Port, Cortex, or building a custom React dashboard. But Backstage’s plugin ecosystem and OSS flexibility remain unmatched.
4. How do I ensure plugin scalability for large orgs?
Use lazy loading, paginate API calls, offload heavy tasks to backend plugins, and monitor response times. Break large plugin logic into micro frontends or separate plugin bundles.
.webp)


.webp)


