TL;DR:
- Google Cloud Backup & DR protects your data with snapshots, cross-region vaults, and restore capabilities, but it won't recreate your VPCs, load balancers, IAM roles, or DNS. You need Infrastructure-as-Code for that.
- Test your DR before you need it. We walked through restoring a VM from a cross-region snapshot in 82 seconds (51s disk restore + 31s VM boot). Run this quarterly to measure your actual RTO and catch issues early.
- Configuration drift kills recovery. When your Terraform code says e2-medium but the cloud runs e2-micro, restores fail unpredictably. Platforms like Firefly continuously detect drift, track ClickOps changes, and let you revert to known-good configs via pull request.
- Layer your protection: data, configuration, and application state. Google Cloud Backup & DR handles data snapshots. Firefly adds codification of unmanaged resources, mutation tracking for root-cause analysis, application-level snapshots for rollbacks, and governance policies to prevent disasters before they happen.
If you've worked in Google Cloud long enough, you definitely have enabled backups. You might even have cross-region snapshots in place. But the hard part isn't taking backups; it is rebuilding a working environment under pressure, networking, IAM, load balancers, databases, secrets, service accounts, and making sure it behaves exactly like production did before the incident.
Now, before going deeper, two terms are important to be discussed beforehand:
- RTO (Recovery Time Objective) is the time you need to get the system back online after an incident. If your RTO is two hours, everything, restore, rebuild, validation, traffic switch, must be completed inside that window.
- RPO (Recovery Point Objective) is how much data you can afford to lose. If your RPO is 15 minutes, your backup or replication strategy must guarantee a recovery point no older than 15 minutes.
These two numbers drive your disaster recovery design. Not preference. Not cost alone. Not convenience. Google Cloud Backup & DR gives you the foundation for protecting data: scheduled backups, retention rules, vault storage, and restore capabilities. That's necessary. But it's only the first layer.
Now, let's start by understanding the capabilities of Google Cloud Backup & DR and how to set up disaster recovery in Google Cloud.
How Do I Actually Set Up Disaster Recovery in Google Cloud? (A Step-by-Step Workflow)
Disaster recovery is not a single feature. It's an architectural decision. If the components are not already wired together before an incident, recovery will be manual and inconsistent.
Below is a layout for a production-grade Google Cloud disaster recovery setup.
1. Primary Production Region (Where Your App Actually Runs)
This is the region actively serving customer traffic. For example, if your application runs in us-central1, the production region typically contains:
- A VPC with subnets across multiple zones (us-central1-a, us-central1-b)
- Compute Engine instances or a GKE cluster running application services
- Cloud SQL or AlloyDB instance for transactional data
- Filestore or persistent disks for shared storage
- Internal and external load balancers
- Service accounts with scoped IAM roles
- Cloud Monitoring dashboards and alerting policies
- Cloud DNS records pointing to the load balancer IP
This region handles:
- User traffic
- Background jobs
- API requests
- Database writes
- File uploads
Every resource here must be considered in your recovery plan. Not just the database. Not just the VM. The entire runtime dependency chain.
2. Backup Vault in an Alternate Region (Don't Store Backups Where Production Runs!)
Backups must not live in the same region as production. If production runs in us-central1, configure backup vaults in a separate region, such as:
- us-east1
- us-west2
For example:
- Cloud SQL backs up every 15 minutes
- Compute Engine disk backups daily
- Filestore backups daily
- Retention 30–90 days
- Vault location: us-east1
If us-central1 experiences a full regional outage, your recovery points are still accessible in us-east1. Regional separation is what makes restoration viable during infrastructure-wide failure.
3. Infrastructure-as-Code Repository (Or You'll Be Rebuilding Everything Manually)
Every resource in production must exist as Infrastructure-as-Code. This includes:
- VPCs and subnets
- Firewall rules
- Routes
- Cloud NAT
- Load balancers
- Backend services
- Health checks
- Instance templates
- Managed instance groups
- GKE clusters
- Cloud SQL instances
- IAM bindings
- Service accounts
- Monitoring alerts
If even one of these was created manually in the console and never codified, you will discover it during recovery. The IaC repository must support:
- Region parameterization
- Environment variables (prod vs recovery)
- Reproducible deployments
If your code cannot deploy cleanly into a second region today, it will not deploy cleanly during an outage.
4. CI/CD Restore Pipeline (Automate Recovery Before You Need It)
The infrastructure code alone is not enough. You need automation to execute it.
The restore pipeline should:
- Accept recovery region as input
- Pull the correct git commit (ideally the last stable deploy)
- Initialize Terraform with a clean backend
- Deploy networking first
- Deploy compute and database resources
- Wait for health checks to pass
This pipeline must already exist and be tested. Writing it during an outage increases recovery time.
5. Secrets and Identity Management (Invalid Credentials = Still Downtime)
Recovery fails quickly if secrets are mishandled. Your architecture must ensure:
- Secrets are stored in Secret Manager
- Service account keys are not hard-coded
- IAM bindings are reproducible via Terraform
- Database credentials can be rotated
During recovery:
- Validate that Secret Manager entries exist in the recovery region
- Rotate database credentials
- Confirm service accounts have the correct roles
- Ensure workload identity bindings are intact
A restored database with invalid credentials is still down.
6. Monitoring and Alerting (Can You Tell If a Backup Failed Last Night?)
Monitoring must be active in both primary and recovery regions.
Track:
- Backup job success count
- Timestamp of last successful backup
- Database replication lag (if using replication)
- Application health endpoint response codes
- Load balancer backend health percentage
Alert examples:
- Backup job failure in the last 24 hours
- No successful DB backup within the RPO window
- Replication lag exceeding 5 minutes
- Backend unhealthy count > 0
If you cannot measure these metrics, you cannot validate recovery.
7. DNS Failover with Cloud DNS (The Last Step Before Traffic Switches)
Traffic control must be planned.
Use:
- Low TTL records (60 seconds or lower)
- Separate A/AAAA records per region
- Manual or health-based failover strategy
During recovery:
- Confirm the recovery region load balancer is healthy
- Update the DNS record to point to the recovery IP
- Wait for TTL expiration
- Monitor the traffic error rate
DNS is usually the final action before declaring recovery complete. All of these components must already be connected. When an incident occurs, recovery should follow a defined execution path rather than ad hoc troubleshooting.
The Actual Recovery Steps (In Order)
With the architecture in place, the recovery sequence should be predictable:
- Identify the last valid backup in the alternate-region vault
- Trigger CI/CD restore pipeline with recovery region parameter
- Provision networking and infrastructure via Terraform
- Restore the database into recovery region
- Attach restored disks to compute instances
- Validate application health (HTTP 200, DB connection test, critical query execution)
- Update DNS to the recovery load balancer
- Monitor traffic and error rates
This process should be rehearsed before production traffic ever depends on it.
Example: Testing Cross-Region DR Recovery
Testing cross-region restore is important for surviving real disasters like the one that happened on June 12, 2025. Google Cloud experienced a global outage affecting multiple products across all regions for 3 hours. An invalid quota update caused widespread API failures. While most regions recovered within 2 hours, us-central1 took significantly longer due to database overload. During those critical hours, teams with tested cross-region DR could fail over to alternate regions, while those without it were completely down.
That is why it is important that until you've actually restored a VM from a snapshot in a different region and verified the data is intact, you haven't proven your DR works.
Here's a complete end-to-end walkthrough of testing disaster recovery. This demonstrates the recovery flow in practice and validates that your backups are actually restorable.
1. Create a Stateful VM in a Primary Region
Region: us-central1 | Zone: us-central1-a
First, provision a VM with an actual state, not just a blank instance.
After the VM boots, verify the data exists:
The boot disk now has a non-default state. This isn't just restoring a blank VM; you have application-level data stored on the persistent disk.
2️. Create a Snapshot Stored in Another Region
Take a snapshot of the disk and store it in a different region:
Apply this and verify using:
What this means:
- Snapshot was taken from disk in us-central1-a
- Snapshot data is stored in us-east1
- Snapshot is a global resource accessible from any region
- It can survive a complete failure of us-central1
This step simulates your recovery point existing in a safe location.
3️. Simulate a Production Failure
Destroy the original VM to simulate a disaster:
This simulates:
- Accidental deletion
- Zone failure
- Region outage
After destruction:
- The VM is gone
- The original boot disk is gone
- Only the snapshot remains in us-east1
This is exactly what DR looks like.
4️. Switch to a Recovery Region
Update your Terraform provider configuration:
This represents:
- Primary region unavailable
- Rebuilding infrastructure in the secondary region
- You do not reuse us-central1
That's the entire point of cross-region DR.
5️. Recreate a Disk from the Snapshot
Create a new persistent disk from the snapshot:
Apply this:
What this does:
- Materializes a new persistent disk in us-east1-b
- Uses snapshot stored in us-east1
- Copies data blocks into a new disk resource
Measured time: ~51 seconds
That's your disk-level restore time for this workload.
6️. Rebuild the VM from the Restored Disk
Create a new VM using the restored disk:
Apply this:
What this does:
- Attaches the restored disk as the boot disk
- Creates a new Compute Engine instance in the recovery region
- Boot OS from the restored disk
Measured time: ~31 seconds
That's your compute rebuild time.
Total recovery time: ~82 seconds (disk restore + VM boot)
7️. Verify Data Integrity
SSH into the recovered VM and validate your data survived:
Expected output:
This confirms:
- Snapshot captured the disk state correctly
- Disk restore was successful
- VM booted from the restored disk
- Application-level data survived region transfer
- The recovery region is fully operational
This is the most important validation step.
What Does This Test Prove About Your DR Setup?
This hands-on test validates your entire DR architecture:
- Snapshots work: Data was captured at a point in time
- Cross-region storage works: Snapshot survived in the alternate region
- The restore process works: Disk was rebuilt from a snapshot
- VM recovery works: Instance booted successfully
- Data integrity is maintained: Application state survived
Without this test, you don't know if your DR actually works.
Many teams assume backups work until they try to restore during an actual incident and discover:
- Snapshots are corrupted
- Cross-region permissions are missing
- Terraform configurations are outdated
- Data didn't persist correctly
Run this test quarterly. Measure your actual RTO. Document any issues. Fix them before you need DR in production.
How Often GCP Resources Should be Backed Up
Most teams enable backups once and never revisit the configuration. That usually means daily snapshots and 7-day retention, which is not aligned with real RPO requirements.
Backup configuration should be driven by workload type and data criticality, not defaults.
What Needs to Be Backed Up?
Databases (Cloud SQL / AlloyDB) - Drive your RPO
- Production: Every 15 minutes + cross-region vault
- Retention: 7 days short-term, 90 days archival
- Critical: If RPO is 15 minutes, backup frequency must match
Compute Engine Disks
- Back up data disks that store the state
- Boot disks only if they contain the configuration
- Stateless instances in managed groups: skip backups
Filestore
- Daily minimum, increase if high-change rate
- Longer retention matters (corruption discovered late)
Terraform State
- Enable GCS object versioning
- Add retention policy and access logging
- State corruption = broken deployments
Container Images (GKE)
- Preserve exact image tags/digests used in production
- Prevent Artifact Registry from purging required versions
Secrets
- Never back up in plaintext
- Ensure Secret Manager entries exist in the recovery region
- Document version numbers used by workloads
Which Region Should I Store My Backups In?
One rule: The production and backup regions must not share failure domains.
- us-central1: vault in us-east1 or us-west2
- europe-west1: vault in europe-west4
For stricter isolation:
- Use separate projects for backup vaults
- Restrict IAM so operators can't delete vault contents
Regional separation determines whether recovery is possible during a full-region outage.
Why Do My Restores Keep Breaking? (You're Missing Infrastructure Metadata)
A snapshot gives you data. It does not give you context. Recovery must restore the state and configuration together.
What Information Should I Store with Each Backup?
For predictable recovery, store the following metadata with each recovery point:
1. Terraform Modules and Commit Hash
- Git commit hash of infrastructure code
- Terraform module version used for deployment
- Terraform CLI version
2. Terraform State Snapshot
- State file version ID
- Backend bucket name
- State locking configuration
3. Helm Charts and Kubernetes Manifests (for GKE workloads)
- Helm chart version
- values.yaml checksum
- Kubernetes deployment revision number
- Container image tags
4. Container Image Versions
- Store exact image digests: gcr.io/project/app@sha256:abcd1234...
5. Metadata File Per Backup
Create a structured file per recovery point: backup-2024-01-15-us-central1.json
This file becomes your reference point during restore, ensuring you rebuild the exact infrastructure version that was running at backup time.
Where Should This Metadata Actually Go?
Options:
- Store in the same Git repository under a recovery directory
- Store in a GCS bucket with object versioning enabled
- Store alongside CI/CD pipeline artifacts
Access must be controlled and read-only for most users.
What to Check After You Restore (Don't Skip These)
After restoring resources:
- Rotate database credentials if stored locally
- Validate IAM bindings
- Confirm service account permissions
- Verify instance metadata does not contain stale secrets
- Confirm the application health endpoint returns the expected status
- Run at least one business-critical transaction test
- Verify schema compatibility between the restored database and the application code
What If Someone Deleted a Resource or Made Undocumented Changes?
GCP DR protects your recovery points. It ensures that disks, databases, and file systems can be restored to a previous state. That's necessary, but most production incidents don't fail because backups are missing. They fail because infrastructure and configuration are inconsistent.
Here's where recovery typically breaks down:
- A resource was created manually in the console and never codified
- IAM bindings drifted from what's defined in Terraform
- A load balancer change was made through ClickOps and not tracked
- A deletion happened, and nobody knows exactly what changed
- The restore recreates the database, but the application config doesn't match the restored schema
Google protects the data. Recovery fails at the configuration layer. Firefly addresses that layer.
The Problem: Backups Don't Capture Configuration Drift
Even with frequent backups and cross-region vaults, teams often struggle with:
- Configuration drift between Terraform and live resources
- ClickOps changes are not reflected in the code
- Deleted resources that are hard to reconstruct
- Unclear root cause during incidents
- Manual recovery steps outside CI/CD
When infrastructure state and code diverge, restore becomes unpredictable. Without automation, disaster recovery planning is a manual, error-prone process. You'd need to manually track every resource, document every configuration, track every change, and hope nothing was missed.
In reality, manually created load balancers, forgotten IAM bindings, undocumented ClickOps changes, and drifted configurations almost always slip through, leaving gaps in your DR coverage that you only discover during an actual incident. That is where cloud orchestration platforms like Firefly come in.
How Firefly Solves the Configuration Problem
Firefly provides three foundational capabilities that enhance your disaster recovery readiness: Codification, Drift Management, and Mutation Tracking. These ensure your infrastructure is well-documented, consistent, and auditable—making recovery faster and more reliable.
1. Codification: Converting Live Unmanaged Resources into Infrastructure-as-Code
Firefly can convert existing cloud resources into Infrastructure-as-Code definitions across multiple formats (Terraform, Pulumi, CloudFormation, and more).
Role in DR:
- Resources created manually become codified and manageable
- You can recreate exact resource configurations during recovery
- Dependencies and relationships are automatically captured
- Recovery doesn't depend on memory or outdated Terraform files
How it works:
To codify unmanaged resources, navigate to Inventory > Unmanaged, where Firefly displays all resources not currently tracked in Infrastructure-as-Code. Select the resources you want to codify, then click Codify to generate IaC templates. You can choose your preferred format, whether that's Terraform, Pulumi, CloudFormation, or another supported format, and export the generated code directly to your Git repository via pull request.
Here's how Firefly shows an unmanaged VM named dr-recovered-vm that needs to be codified:
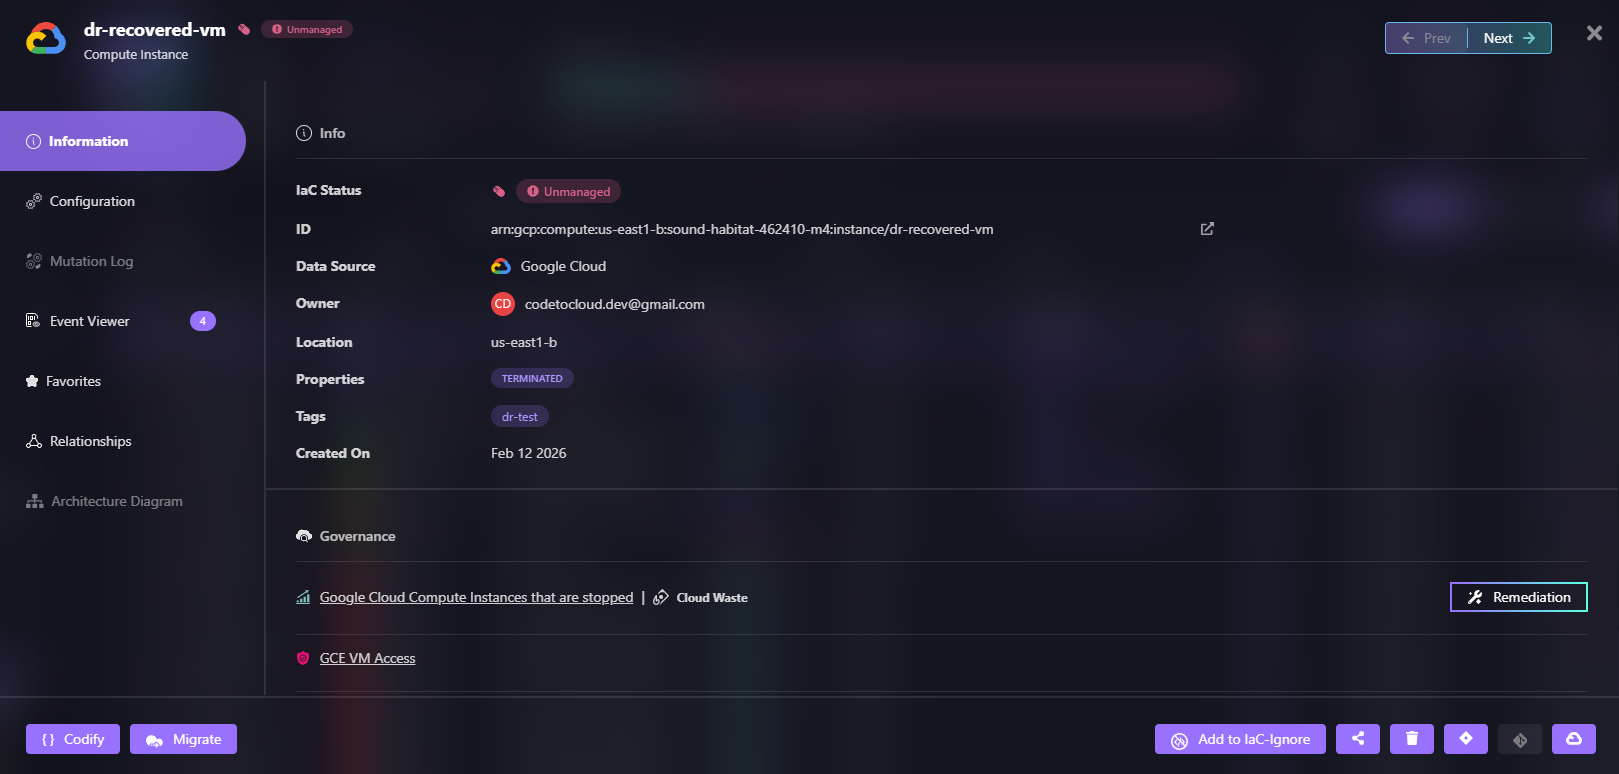
If something is running in production, it can be captured as code and version-controlled.
2. Deleted Asset Recovery via Pull Request
When a VM, load balancer, or database instance gets deleted, Firefly tracks it.
Recovery process:
- Go to Inventory > Deleted
- Filter by time range to find recently deleted resources
- Select the deleted asset
- Click Codify to generate the IaC template for that asset
- Create a pull request to your infrastructure repository
- Review and merge, your CI/CD pipeline recreates the resource
What this provides:
- Deleted resources remain visible in Firefly's inventory
- You can restore them through the standard GitOps workflow
- Recovery becomes auditable and controlled
- No manual console recreation needed
This ensures the restored asset is managed by code, reducing the risk of future drift.
3. Mutation Logs and ClickOps Event Tracking
During an incident, you need answers fast:
- Who changed this resource?
- What exactly changed?
- When did it happen?
Firefly's Event Center tracks:
- All configuration changes (mutations)
- ClickOps events (console changes not in code)
- Who made each change
- Detailed before/after states
Here's how Firefly's Event Center captured ClickOps activity when someone stopped the dr-recovered-vm instance:
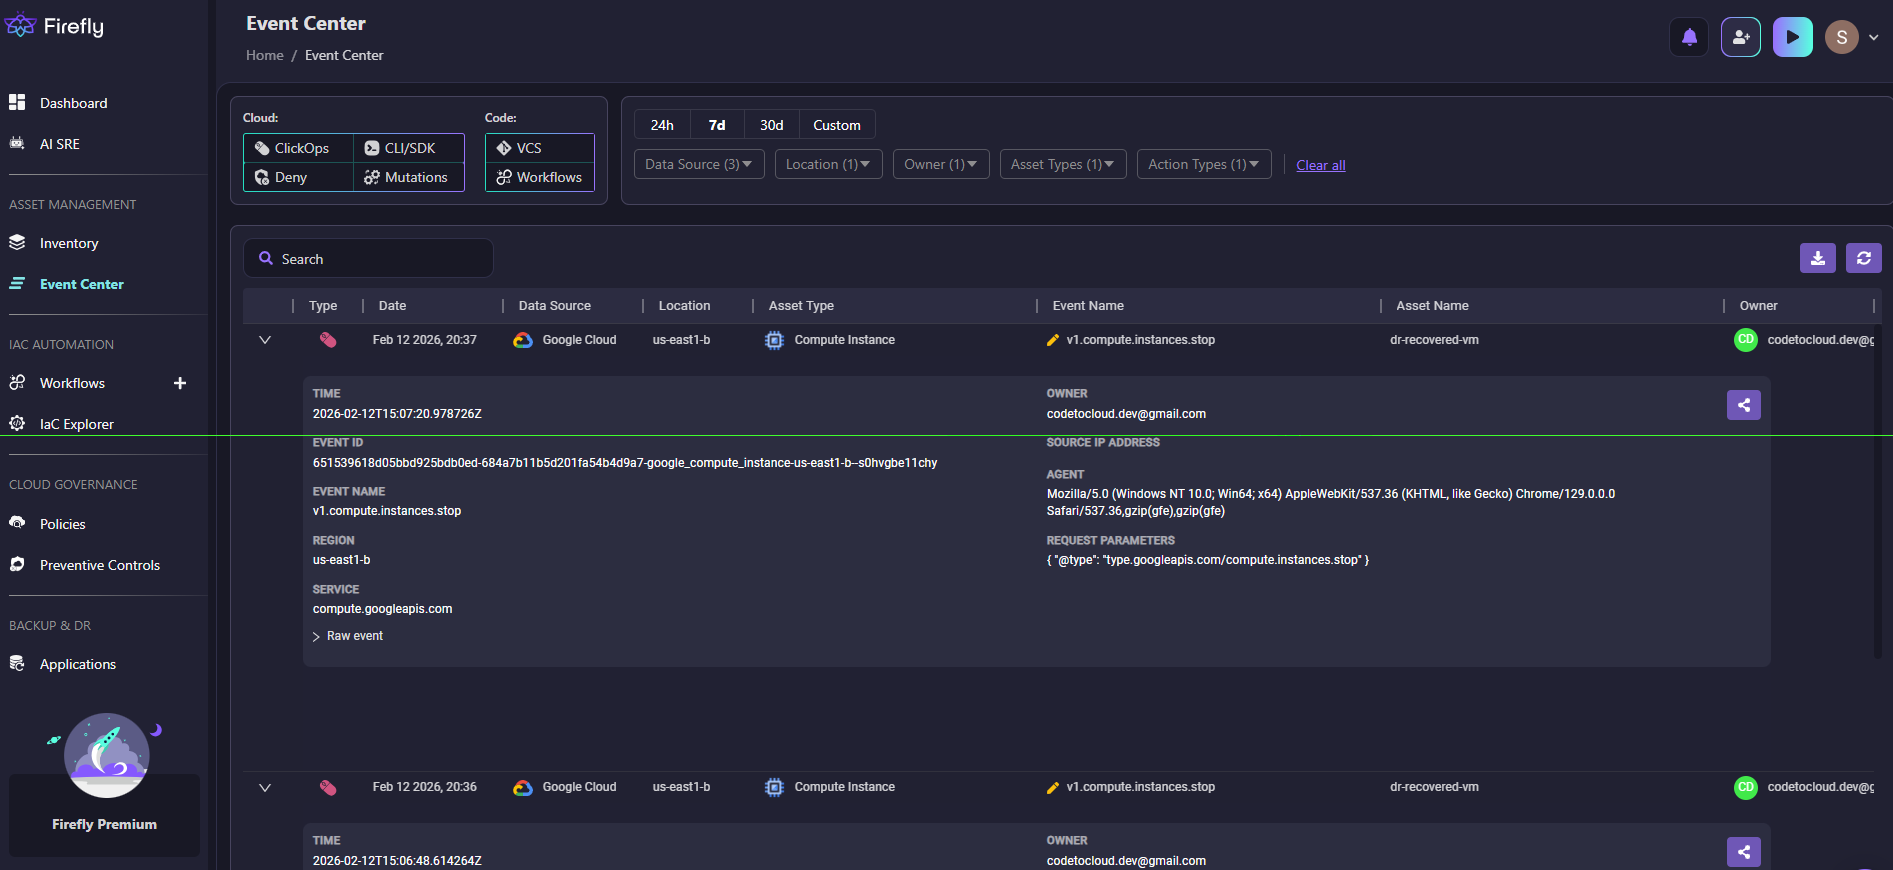
Root cause analysis:
- Go to the Event Center to view all mutations and ClickOps events
- Filter by data source, environment, account, and location
- Click on a suspicious asset to view its mutation log
- Review the timeline of configuration changes
- Select a specific revision and click Codify Revision
- Generate IaC for that point in time
- Submit a pull request to revert to the known-good state
Instead of digging through raw Cloud Logging audit logs, you see structured change history with the ability to instantly codify and restore any previous configuration.
4. Application Backup: Creating Snapshots for Rollback
Beyond individual resource recovery, Firefly provides application-level backup and restore capabilities. This allows you to capture the entire configuration state of your applications and roll back to any previous snapshot when needed.
How it works in DR:
- Capture the complete application state at a point in time
- Roll back entire application configurations after failed deployments
- Restore known-good configurations during incidents
- Maintain the version history of your application infrastructure
How to create application backups:
First, create an application by grouping your resources. Navigate to Backup & DR > Applications and click Create New Application. Here's how Firefly lets you create an application by selecting your data source:
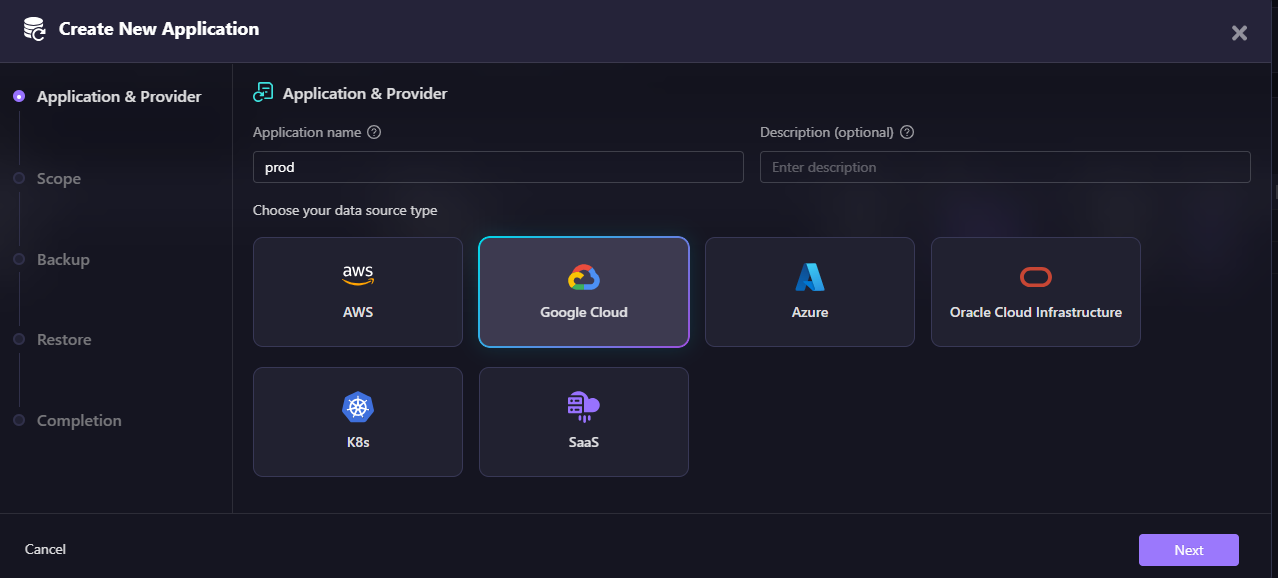
Once your application is created, Firefly automatically takes snapshots of the configuration state. Here's how Firefly shows configuration snapshots for the prod-vms and Audit-logs applications:
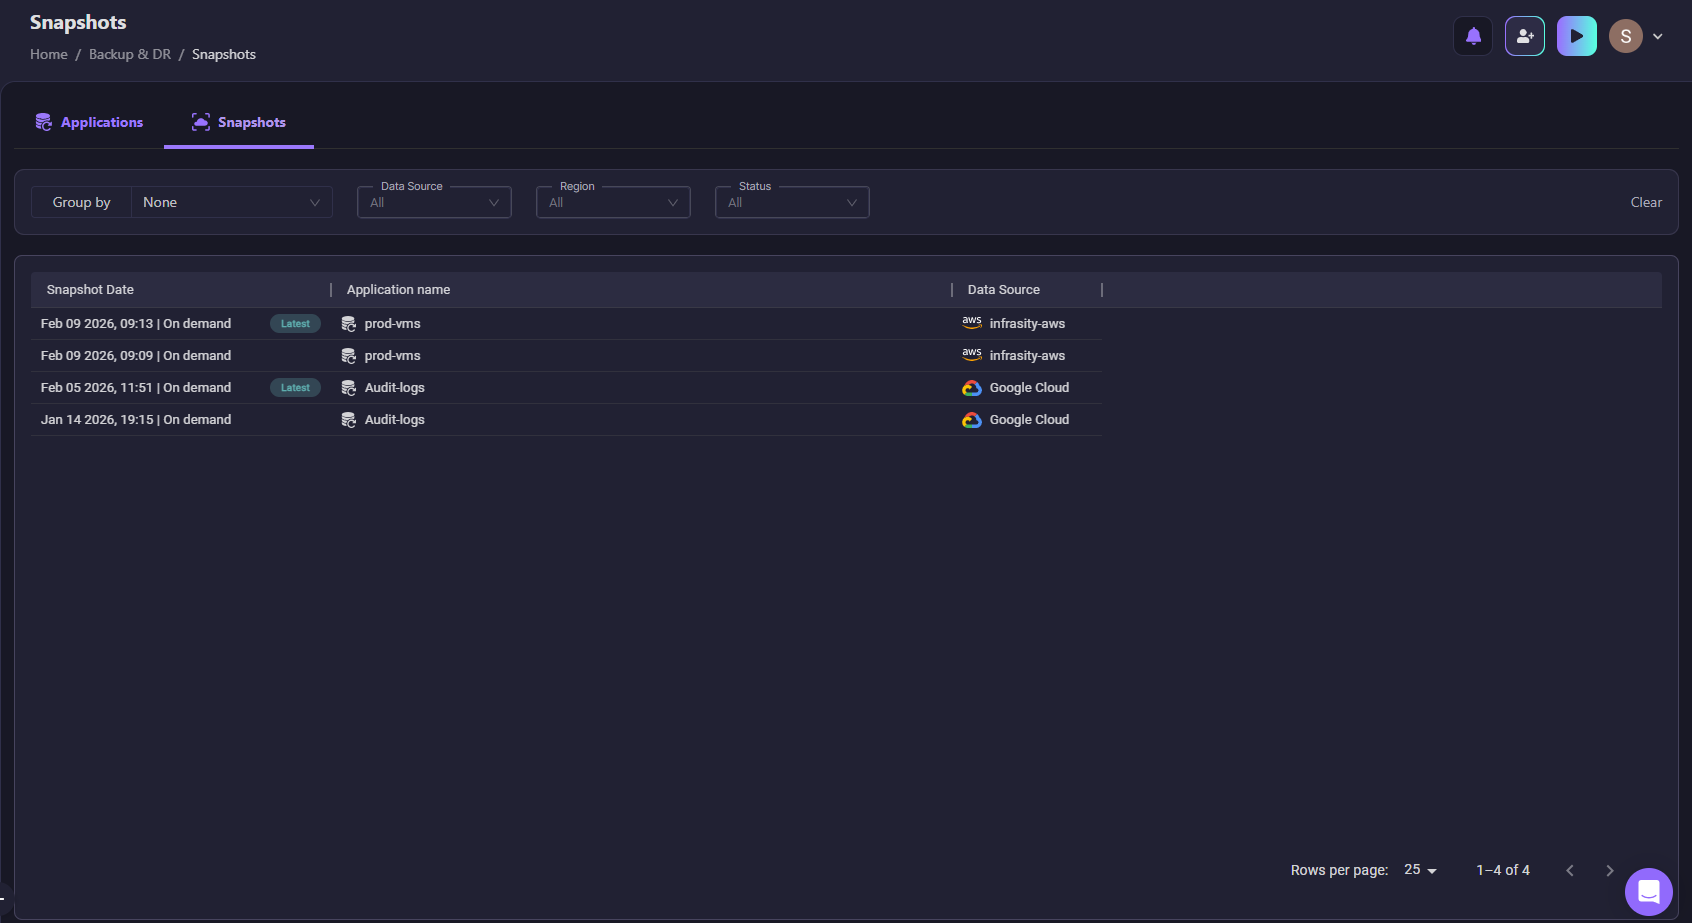
Snapshot capabilities:
- On-demand snapshots: Manually create snapshots before making risky changes
- Scheduled snapshots: Automatic backups at regular intervals
- Latest marker: Quickly identify the most recent configuration
- Cross-cloud support: Works with AWS, Google Cloud, Azure, and Kubernetes
- Application-scoped restore: Roll back entire applications, not just individual resources
This gives you an additional layer of recovery beyond Google Cloud Backup & DR—you can restore not just the data, but the entire application configuration to any previous state.
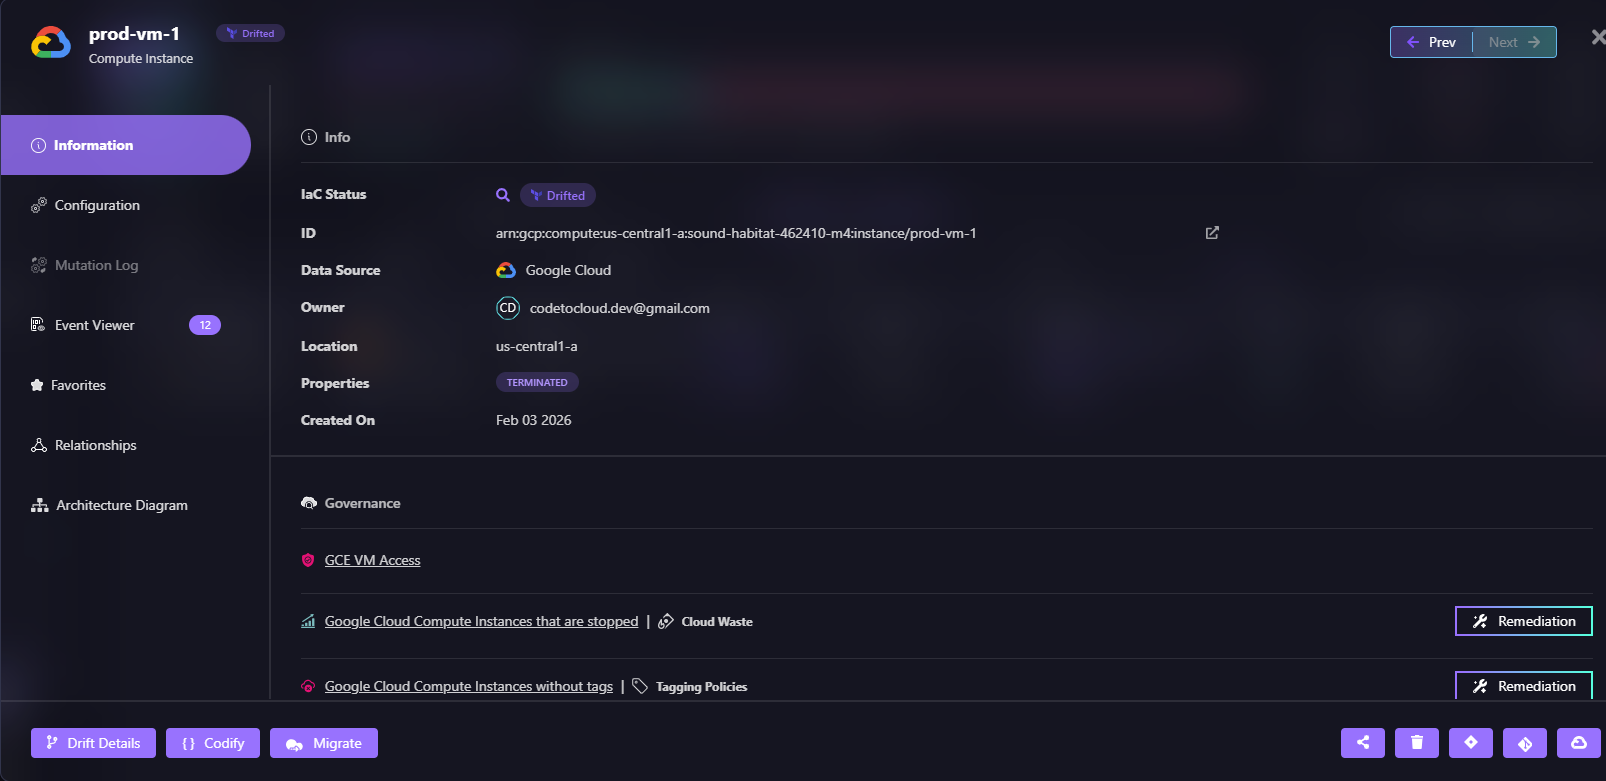
5. Drift Detection and Remediation
Configuration drift is one of the biggest recovery risks. If Terraform defines one thing and the cloud runs another, restore will not behave predictably.
Firefly continuously monitors for drift:
- Compares live resource configurations against IaC definitions
- Alerts you when resources diverge from code
- Shows exactly what changed
As shown in the snapshot below, the prod-vm-1 instance drifted from its IaC definition:
When drift is detected, you can:
- Reconcile cloud to match code: Revert the live resource to match IaC
- Update code to match cloud: Capture the current state in IaC
- Set up drift alerts: Get notified via Slack, Teams, or email
Firefly also shows the exact drift difference for prod-vm-1, the machine type was changed from e2-medium (defined in IaC) to e2-micro (running in the cloud):
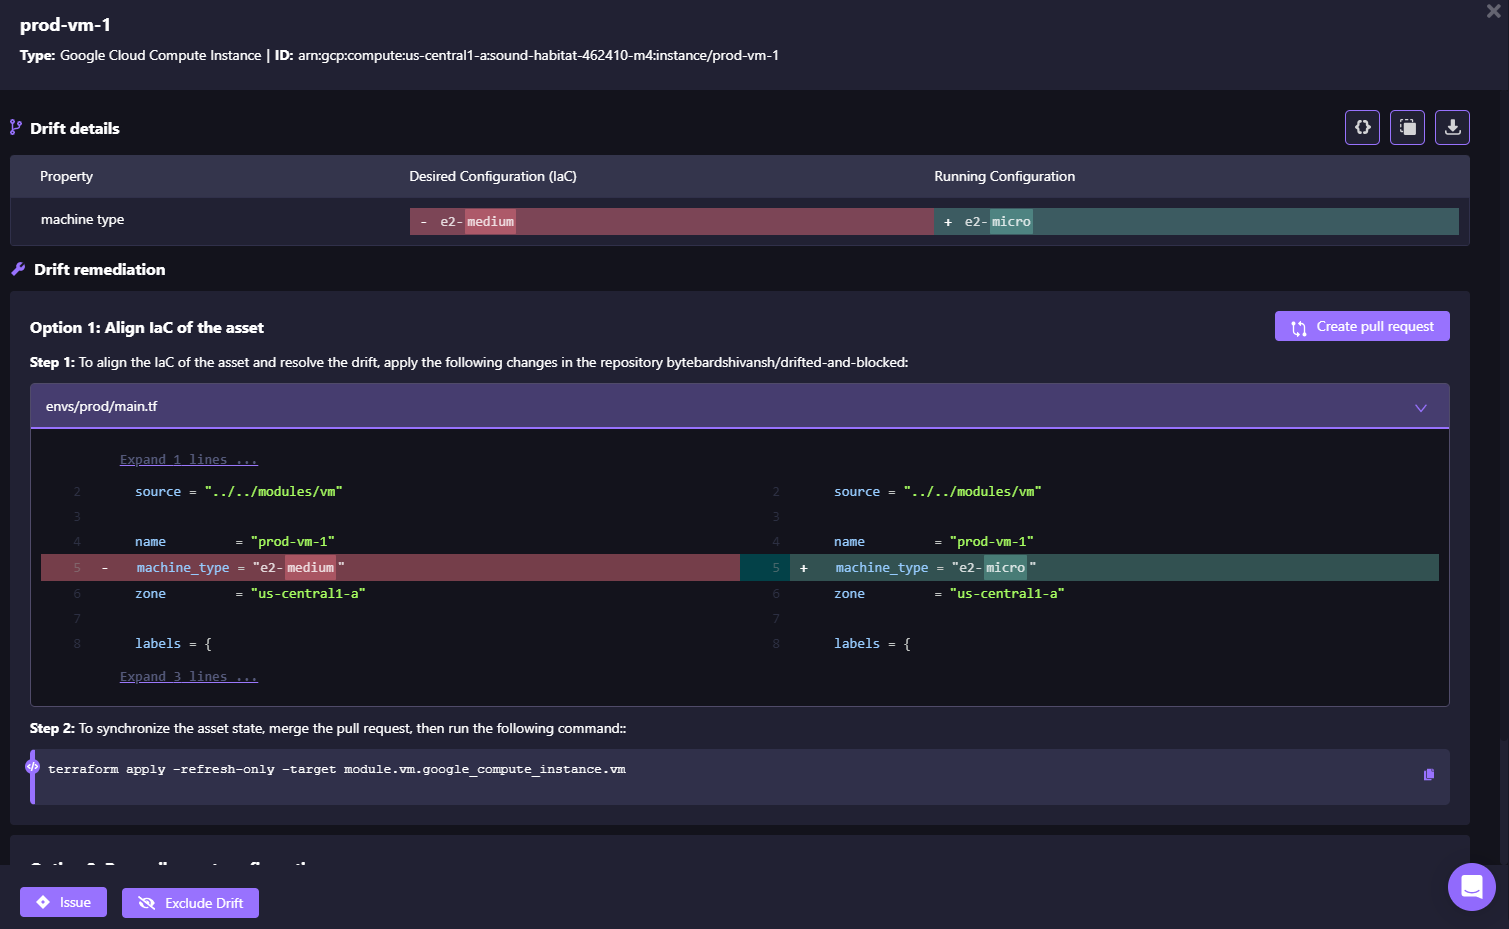
Drift control makes recovery deterministic; you know exactly what will happen when you restore.
FAQs
What are the three disaster recovery patterns according to Google?
Cold (backup and restore, lowest cost, highest RTO), Warm (reduced-capacity standby in another region), and Hot (active-active multi-region with lowest RTO). The right choice depends on your RTO, RPO, and budget.
How do you handle disaster recovery in a cloud environment?
Protect data with cross-region backups, codify infrastructure in Terraform, automate regional redeployments via CI/CD, and test recovery regularly. Backups without automated rebuilds are not full DR.
What are the 4 phases of disaster recovery?
Prevention (backups and safeguards), Preparation (runbooks and testing), Response (failover and restore), and Recovery (stabilization and post-incident improvements).
Does Google Cloud have backups?
Yes. Google Cloud Backup & DR supports automated backups for VMs, disks, Cloud SQL, AlloyDB, Filestore, and VMware. It protects data, but infrastructure rebuild still requires IaC and automation.

.avif)
.avif)


.webp)


.webp)


